INTRODUCTION TO WINDOWS 7
INTRODUCTION TO WINDOWS 7
Microsoft Windows 7 is the newest version of Microsoft’s client operating system software. Microsoft has taken the test of windows xP and Windows Vista and combined them into their latest creation, Windows 7. Along with the best of Windows XP and Vista, Microsoft has added several new features to Windows 7 to make more functionality available to users from one location.
Windows 7 eliminates many of the problems that plagued windows vista, and includes a much faster boot time and shut down. It is also easier to install and configure, and barely stops to ask the user any question during installation. Windows 7 was officially released to the public October 22, 2009.
STARTING WINDOWS 7
To start Windows 7 , you need to just turn ON the computer. You may need to insert the username and password if you created it during the installation of windows 7 . Once you login to the desktop environment, the windows 7 desktop appears.
If you haven’t set any username and password during the installation, you will be directly directed to the windows 7 desktop. This is shown in the following figure.
The parts of the windows screen are:
The desktop, which occupies most of the part of the screen. The desktop is the entire screen, except for the bar at the bottom. Windows, dialog boxes, and icons, such as the Recycle Bin, are displayed on the desktop.
The Start button in the lower-left corner, which opens the Start menu.
The taskbar across the bottom, identifies programs that are running or “pinned to it.
The notification area in the lower-right area holds icons of running system programs.
The Show Desktop button, at the rightmost of the taskbar, minimizes all open windows so you can see the desktop.
Desktop icons, which can be in any number and anywhere on the desktop, are in the upper-left corner of the above shown figure. Desktop icons are used to start programs or open files or folders.
 |
WORKING WITH START MENU
The Start menu () is the main gateway to your computer’s programs, folders, and setting. It’s called a menu because it provides a list of choices, just as a restaurant menu does. And as the word start implies, it’s often the place that you’ll go to start or open the setting.
Press the window key on your keyboard or click the Start button on the desktop to display the start menu as shown in the following figure.
Use the start menu to do these common activities:
Start programs.
Open commonly used folders.
Search for files, folders, and programs.
Adjust computer settings.
Get help with the windows operating system.
Turn off the computer.
Log off from Windows or switch to a different user account.
The most important menu item is All Programs, which opens a menu within the start menu of all your programs. When you move your cursor away from the Start menu, it disappears.
SHUTTING DOWN THE COMPUTER
You can end your windows session in several ways, depending on what you want to do. All of these can be found on the Start menu. When you open the Start menu by clicking the Start button also has a right-pointing arrow which opens a menu of options that are in addition to Shut Down as can be seen in the following figure.

The meanings of the various option in the Shut Down menu are :
Shut Down closes all active programs and network connections and then turn off the computer.
Switch User leaves all active programs and your user account active but hidden while your let another person use the computer.
Log Off closes all active programs and your user account but leaves Windows 7 and the computer running so another person can log on.
Lock leaves all active programs and your user account active but displays the welcome screen, where your must click your user icon and enter a password, if you have established one, to resume using the computer.
Restart closes all active programs and logs off all users so that no information is lost. Windows is ten shut down and restarted.
Sleep leaves all active programs and your user account active and in memory, but also saves the state of everything on disk. Your computer is then put into a low power state that allows you to quickly resume working exactly where you were when you left. Press the Power button or any key to resume from Sleep. Sleep does not work if the computer is powered OFF.
Hibernate mode is mainly for laptops because it saves your battery life. When you choose Hibernate, open documents or program settings are saved to your hard drive, and your computer switches off. Sleep uses a bi of power and allows you to quickly get back to work after only a few seconds.
USING WINDOWS EXPLORER
The tool that Windows 7 provides to locate and work with files and folders is Windows Explorer. Windows Explorer has a number of components and features which are shown in the following figure.

To open Windows Explorer:
Right click the Start button. Following shortcut menu is displayed:

From the shortcut menu, choose the Open Windows Explorer option, or click the Windows Explorer button () on the Taskbar. This will open the following window of Windows Explorer on your screen.

You can:
Click an object in the Subject pane to select it an get information about it in the Details pane, preview it in the preview pane, or
Double-click an object in the Subject pane to open it so that you can see and work with contents.
Moving a File or Folder
It is a common task to move a file or a folder from its present position to a new one. It can be moved to some other drive, folder, pen drive or elsewhere.
To move a file or folder:
Open Windows Explorer by right clicking on the Start button and choosing Open Windows Explorer.
In the resulting Windows Explorer window, select a file or folder you want to move. If the file or folder is not in the default folder, then double click on a series of folders to locate the file or folder that you want to move.
Click and drag the file to another folder in the Navigation pane on the left side of the window.
If you right-click and drag, you’re offered the options of moving, copying or creating a shortcut to the item when you place it via a shortcut menu that appears.
Click the Close button in the upper-right corner of the Windows Explorer window to close it.
Creating shortcuts
A shortcut is a link to an item ( such as a file, folder, or program) on your computer. You can create shortcuts and then place them in a convenient location, such as on the desktop, so that you can easily access the item that the shortcut links to.
Shortcuts can be distinguished from the original file by the arrow that appears on the icon.


Locate the file of the folder by using Windows Explorer.
In the resulting Windows Explorer window, right-click the file or folder that you want to create a shortcut for. this shortcut menu is displayed below:

Choose Send To -> Desktop ( Create Shortcut ) from the shortcut menu.
A shortcut of the selected file or folder is created on the Desktop.
WORKING WITH FILES AND FOLDERS
Files are the individual documents that you save from within an application, such as Word and Excel, and you use folders and subfolders to organize several files into groups or categories, such as by project or by customer. The purpose of a file system, of course, is to locate and use the files and folders on your computer.
A folder is a container for storing programs and files, similar to a folder in a file cabinet. As with a file cabinet it is frustrating and time-consuming to search through irrelevant, misnamed, and out-of-date files to find the one you want. Windows allows you to organize folders and files in a file hierarchy, imitating the way you store paper documents in real folders.
Using the file management tools, you can save files in folders with appropriate names for easy identification, quickly and easily create new folders so you can reorganize information and delete files and folders that you no longer need. You can also search for a file when you cannot remember where you stored it, create shortcuts to files and folders for quick and easy access, and even compress files and folders to save space.
A folder can hold different types of files, such as text, spreadsheets, and presentations.
The Documents folder is the default location in Window 7 where you store you files. However there are some special folders, such as Pictures and Music, designed with specialized features to store specific types of files.
Creating a folder
You can create any number of folders and even store folders inside other folders. Folders located inside other folders are often called subfolders.
To create a folder, follow the following steps:
Go to the location (either a drive or a folder or the desktop) where you want to create a new folder.
Right-click a blank area on the desktop or in the folder window, point to New, and then click Folder. Following shortcut menu appears when right clicked on the desktop.

Type a name for the new folder, and then press ENTER.

The new folder you created appears in the location you specified.
Renaming a file or folder
Locate the file or folder you want to rename by using Windows Explorer
Right click the item and choose Rename form the shortcut menu. The shortcut menu is shown in the following figure:

The file name is now available for editing. Type a new file name.
Press enter or click anywhere outside the filename to save it.
Deleting a File or Folder
When a file or folder is deleted from a computer's hard drive, it goes into the Recycle bin before final deletion. In other words, it is not permanently deleted. Moreover, Recycle bin provides you the facility to restore the deleted file and folders in case you deleted anything by mistake. Restore command restores the object to the location form where it was deleted. Once you delete an item from the Recycle bin, it cannot be restored.
To delete a file or folder, follow the following steps:
Select the file of the folder you wish to delete.
Press DELETE form the keyboard or select from the shortcut menu when the item is right-clicked. A message box is displayed on your screen:
Click on the Yes button if you are sure to delete this file or folder.

The files move in the Recycle bin from the current location.
If you’re sure you want to permanently delete a file or folder ( without being moved to the Recycle bin first ), Click the item to select it. Press SHIFT + DELETE and click Yes to confirm the permanent deletion.
CUSTOMIZING THE DESKTOP
The desktop is the work area on a computer screen that simulates the top of an actual desk. The desktop contains the Recycle Bin icon (shortcuts to programs, files, folders, and various types of documents such as letters, reports, or pictures) that you can arrange just as you’d arrange real objects on a desk.
To customize your desktop, you can do the following:
Change the desktop background image and colors.
Use a screen saver setting to a pretty animation when you’ve stopped working for a time.
You can modify your screen resolution setting, switch controls how sharp and detailed a picture your screen displays.
Make text larger or smaller. You can change the size of all text on your screen with an easy setting.
Changing Desktop Background
Your desktop background (also called wallpaper) can be a digital picture form your personal collection, a picture that comes with windows, a solid color, or a picture framed with a color.
Right click an empty area on the desktop and choose personalize from the shortcut menu.

Click the Desktop Background link to display the Desktop Background dialog box, as shown in the following figure:

Select a category of desktop background options from the Picture Location list box.
Click the image preview you want to use. The background is previewed on your desktop.
Click Save changes to apply the settings and close the dialog box.
Changing Screen Resolution
Depending on your computer and monitor, you can display Window 7 with various resolutions.
Right-click an empty area on the Desktop and Click on Screen resolution option form the activated shortcut menu.

Form the displayed dialog box, use the Resolution slider to select a lower or higher resolution. Higher resolutions, such as 1366 x 768 , produce smaller, crisper images. Lower resolutions, such as 800 x 600, produce larger, somewhat jagged images. This is illustrated in the following figure:
Click OK to set the newly set resolution.
Setting up a Screen Saver
A screen saver is an animated image that is activated on a personal computer display when no user activity has been sensed for a certain time. Windows comes with several screen savers. You can also create your own screen saver from personal pictures that you’ve saved on your computer.
Right click an empty area on the desktop choose personalize form the shortcut menu.
Form the personalization dialog box, click the Screen Saver link to display the Screen Saver Setting dialog box shown below:

From the Screen Saver drop –down list, choose a screen saver of your choice. You will be able to see the preview of your choice in the upper section of the dialog box.
Use the arrows in the Wait text box to set the number of inactivity minutes that Windows 7 waits before displaying the screen saver.
When you are finished with your settings, click Apply and then the OK button.
CUSTOMIZING TASKBAR
The taskbar is the long horizontal bar at the bottom of your screen. The taskbar is almost always visible. It has three main sections:
The Start Button, which opens the Start menu.
The middle section, which shows you which programs and files you have open and allows you to quickly switch between them.
The notification area, which includes a clock and icons that communicate the status of certain programs and computer settings.
Move and Resize the Taskbar
You can move the taskbar to any of the four sides of the screen. Do this by dragging any empty area of the taskbar to another edge. For example, following figure shows the taskbar moved to the right edge of the screen.

If you are unable to move the Taskbar, right-click an empty area on the Taskbar and unchecked (remove the tick mark) the Lock the taskbar option.
You can resize the taskbar by dragging the inner edge (top edge when the taskbar is on the bottom) in or out. Here is a taskbar at double its normal size.
Hiding the taskbar
Hiding the taskbar means that it is not displayed unless you move the mouse to the edge of the screen containing the taskbar. By default, it is displayed.
Right-click an empty area and choose properties options from the displayed shortcut menu. The Taskbar and Start Menu Properties dialog box opens up.

Click Auto-hide the taskbar to select the check box.
Click OK to set the changes.
CONTROL PANEL
You can use the Control Panel to change settings for Windows. These settings control nearly everything about how Windows looks and works, and you can use them to set up Windows so that it’s just right for you.
To open the control panel, click Start button -> Control Panel. The default Control Panel window opens on your screen.

Switch the Control Panel View
The Control Panel has three views: the default Category view, Large icons views and Small Icons views.
When in Category view, click the View By down arrow on the fight, and click either Large Icons or Small Icons. Both the views are shown in the following figures – Large icons and Small icons respectively.


Customizing the Mouse
You can change your mouse setting to suit your personal preferences. For example, you can change how fast your mouse pointer moves around the screen or change the pointer’s appearance. If you’re left-handed , you can switch the primary button to be the right button.
Open Control Panel. From the Control Panel window click on the Mouse icon. The Mouse Properties window is opened.

If you want to use the mouse with your left hand, click Switch Primary and Secondary Buttons.
Double-click the folder in the middle-right area of the Buttons tab. If the folder opens, your double-click speed is OK. If not, drag the Speed slider until the folder opens when you double-click it.
Select the options you want to use on the Buttons, Pointer Options, Wheel, and Hardware tabs.
Click the Pointers tab. If you want to change the way the pointer looks, select a different scheme.
When you have set up the mouse the way you want, click OK.
Setting the Clock
From the Control Panel window, click the Date and Time link. Following windows is displayed on your screen:

Click on the Change date and time… button to set the new date and time.
When you are done with the new settings, click OK to exit this window.
You will see the newly set date and time in the notification area of the Taskbar.
Installing a printer
The most common way to install a printer is to connect it directly to your computer. This is known as a local printer. If your printer is a universal serial bus (USB) model, Windows should automatically detect it and begin installation when you plug it in.
To install a local printer, follow the following steps:
Click the Devices and Printers link in the Control Panel window.
Click Add a Printer button. The Add Printer Wizard activates.

In the Add Printer window, click Add a local printer.
On the Choose a printer port page, make sure that the Use an existing port button and the recommended printer port are selected, and then click Next.
On the Install the printer driver page, select the printer driver page, select the printer manufacturer and model, and then click Next.
If your printer isn’t listed, click Windows Update, and then wait while Windows checks for additional drivers.
If none are available and you have the installation CD, click Have Disk, and then browse to the folder where the printer driver is located.
Complete the additional steps in the wizard, and then click Finish.
CONCEPT OF NETWORKING
A Computer network is a logical interconnection of two or more computers so you can use this connection to share files, folders , printers, and access to the Internet with other users.
The most common way to connect a network is to use a wired Ethernet connection, involving cables and equipment, referred to as a hub or switch. To determine whether your computer is Ethernet-ready, check the back of your PC or the side of your laptop. You should see what looks like a very large phone connector jack. This is the Ethernet connectors. After you connect the necessary cables and equipment, most of the new computer systems already have network drivers installed, so Windows 7 is capable of recognizing the connection. With simple-to-use wizards, little input on your part is required to set up a network.

The main characteristics of a computer network are:
You can create files and store them in one computer, then access those files from the other computer(s) connected to it.
You can place a CD with pictures of music on one computer and let other computers access those pictures.
You can connect a printer ( or a scanner, or a fax machine ) to one computer and let other computers of the network print (or scan, or fax) to that printer ( or scanner, or fax machine).
You can place a movie DVD on the computer that has a DVD player, and then view the movie on a computer that lacks a DVD player.
WORKING WITH MULTIMEDIA
Multimedia is the combination of audio and video, with the term media referring to either audio or video. As an operating system, Windows 7 has to be able to handle audio and video files and accept their input for a number of different devices.
Windows Media Player provides an intuitive, eyes-to-use interface to play digital media files, organize your digital media collection, burn CDs of your favourite music, rip music from CDs, sync digital media files to a portable device, and shop for digital media content from online stores.
Windows Media Player allows you to toggle between two modes: the Player Library, which gives you comprehensive control over the Player’s many features; and Now Playing mode, which gives you a simplified view of your media that’s ideal for playback.
To start Windows Media Player, click Start button -> All Programs -> Windows Media Player.
From the Player Library, you can get to Now Playing mode by clicking the Switch to Now Playing button in the lower-right corner of the Player.
To return to the Player Library, click the Switch to Library button in the upper-right corner of the Player.

MAINTAINING THE COMPUTER
Microsoft has created a pair of built-in automated troubleshooting packs to optimize and maintain Windows 7 performance. Windows 7 handles lots and lots of files. So, you need to organize files in logical ways and perform maintenance activities time to time.
Windows 7 provides three tools to help manage the files and folders stored on hard disks.
Disk Cleanup
Disk Cleanup helps you get rid of old files on your hard disk. Windows looks through your hard disk for types of files that can be deleted and lists them. You can then select the types of files you want to delete.
Click Start -> Computer.
Right-click on the disk drive you want to work on and click Properties. This will display the Disk Properties window on your screen.

Click the Disk Cleanup button. Windows 7 will calculate how much space you could save.

Select the types of files to delete, and click OK.
You are asked if you want to permanently delete these files. Click Delete Files to permanently delete them.
When you are ready, close the Properties dialog box.
Checking the Disk for Errors
Error Checking tries to determine if bad areas exist without losing information. If it finds a bad area, that area is flagged so that the system will not use it. Error Checking automatically fixes file system errors and attempts recovery of bad sectors.
To check a disk for errors, follow the following steps:
Click Start, click Computer.
Right-click a disk drive you want to work on, and click Properties.
Click the Tools tab. The Tools tab in the Disk Properties dialog box is shown below:

Click the Check Now… button in the Tools tab.
Select whether you want to automatically fix errors and /or attempt recovery of bad sectors.

Click Start. You may be told to restart Windows to use Error Checking.

If so, close any open applications, click Schedule Disk Check to do a disk check the next time you start your computer, and then restart your computer.
Error Checking will automatically begin when Windows restarts. You will be shown the status of the Error Checking operation and told of any problems that could not be fixed. When Error Checking operation and told of any problems that could not be fixed. When Error Checking is complete, your computer will finish restarting.
Defragmenting a Disk
When files are stored on a hard disk, they are broken into pieces (or fragments) and individually written to the disk. Files on your hard drive can sometimes become spread out, or fragmented, across different sectors of the drive. Fragmentation makes your hard disk do extra work that can slow down your computer.
Defragment the hard drive aligns the pieces of those files in one sector, which increases the efficiency of the operating system to open the files. Disk Defragmenter rearranges fragmented data so your disks and drives can work more efficiently. Disk Defragmenter runs on its own schedule, but you can also analyze and defragment your disks and drives manually.
To defragment your hard disk:
Open the Tools tab in the Disk Properties window ( as we did in the previous process).
In the Defragmentation section, click the Defragment now… button to open the Disk Defragmenter window.
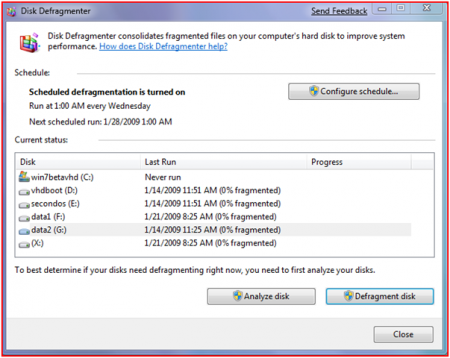
Select a drive and click Analyze Disk to see if the disk needs defragmenting. You should analyze a drive before defragmenting it to get an estimate of how long the defragmentation process will take.
To defragment the selected drive, click the Defragment disk button. The Process can take from several minutes to a couple of hours. This depends upon the size of the disk and the amount of fragmentation. Some fragments may remain, which is fine.
When you are ready, click close the Disk Defragmenter window.
Hey Guy's if you like this Article than please share with your friends and follow for my new Article .

Comments
Post a Comment